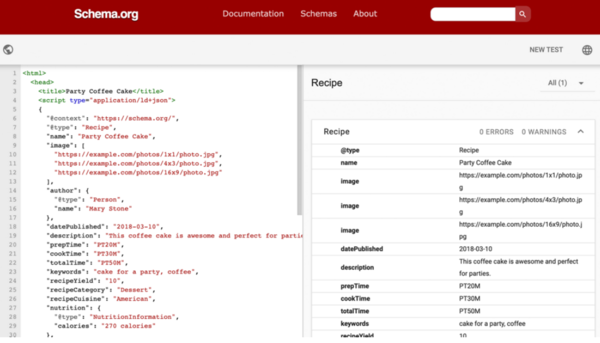
Schema markup is the HTML code format or language that search engines like Google use to read and understand the content on your pages. It is also referred to as “structured data.” Search engines love getting information from your website listed in this format.
The simplest way to do Schema markup, even if you know how to write HTML, is to use one of the automatic tools that write the code for you. Then, you should test the code in the Schema Markup Validator tool on Schema.org to make sure it is formatted correctly. And then, finally, you place this code in the header of your website for a single-location business or within one of the iframes embedded on each of your location pages for a multi-location business.
In this article, I will walk you through how to do all this step by step. If it sounds complicated to you, please don’t worry about it. It is really simple to do, even if you are not a coder.
Before I get into the meat of this article, I have a quick suggestion. If you found this article because you are trying to learn Local SEO, I suggest you start with one of these two articles: “How To Do Local SEO – An In-Depth Overview!” or “What Is On-Page Local SEO?“. See also my article “What Do I Put in My Schema Markup?“.
Why Do Schema Markup For Local SEO?
The first answer is that the search engines want you to. When they scan your website, it is easy for them to get as much information as possible about who you are as a business, what you do exactly, where you are located, and what your social media footprint looks like.
It is necessary for search engines to know all this because this is how they begin to trust that you are a legitimate business and learn enough about you that they can compare this to other information they find around the internet about your business. In other words, Schema markup really helps in your effort to rank in the Google Maps 3 Pack.
Here is a video I did showing the whole process I explain in this article in video format. I hope it is helpful!
What Tool Should You Use To Write Your Schema Markup?
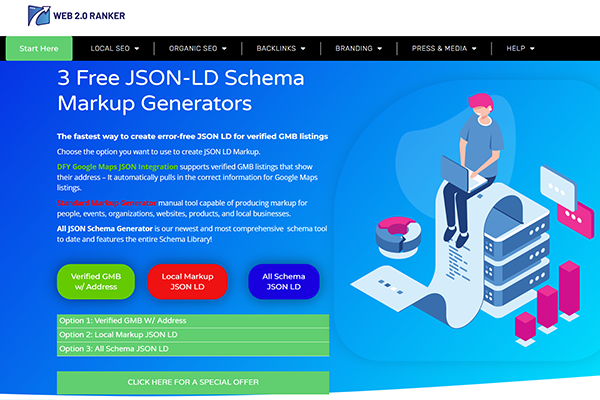
My favorite tool since they make it so simple is this “Local Business Schema Markup” tool by Web 20 Ranker. Then, once it writes your code for you with just one click, it transfers the code to the Schema.org Validator tool to double-check that there are no structural errors. Then, you just copy and paste the code into the tool. It works great.
This free tool gives you three options to create your Schema. The first you use if your business already has a verified Google Business Profile (GBP). This option saves you a lot of time because it grabs a lot of the information it wants to put in your Schema code from your GBP. So, you want to make sure your GBP is fully filled out and optimized before using this option to create your Schema markup. But there is still a form where you fill out some of the information.
It has a list of common business categories. If it doesn’t list your industry, choose the “Local Business” option.
In the second option, you just select “local business” in the options and then fill out all the information yourself. The third is more for coders, and you can write the code yourself how you want it.
Regardless of which of the three options you use, you will want to fill everything out completely. I recommend including links to all your social media and main business directory pages.
How To Fill Out The Tool Form
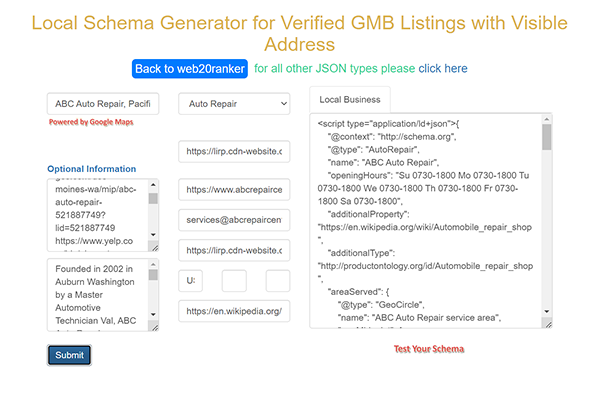
As you can see in the above image, the form is pretty simple if you already have a verified optimized Google Business Profile.
First, you put in your business name and select your Google Business Profile as it pops up. You choose your industry or local business if it doesn’t list your industry.
Under the “Optional Information” section, you add URLs to as many of your social media and directory listing pages as possible. This is important. Then, you write a several-paragraph original keyword-rich business description. Don’t use the same description you used elsewhere.
Then, you put the URL to your website, several images from your website, and a Wikipedia article on your industry. Fill everything out as completely as you can. Then, you click submit. It will then create your Schema markup code in the right-hand box above where it says “Test Your Schema.”
Test Your Schema Markup Code
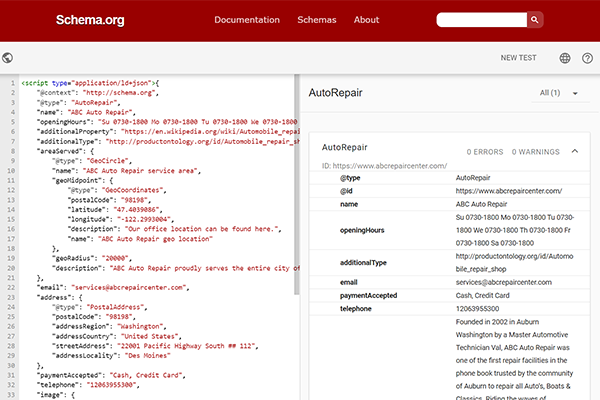
Then, highlight the HTML code it created in the right-hand box and copy it to your clipboard. Once you have done that, you click on the “Test Your Schema” link, which will take you to a page where you can choose between two different Schema validators. I like the one on Schema.org.
Once you choose your selection, it will give you the option to paste in the code, and then you click where it says “Run Test.” This will give you a page like you see in the above image, where it will tell you if you have any errors. I have never seen mine have any errors, but it is good to double-check before you paste the code on your website.
How To Paste Your Schema For A Single Location Business
To insert your Schema markup HTML code that you just tested and know is correct, you then go to your website code where your header is located. In WordPress, you typically click “Appearance” in the left-hand margin and then choose “Theme File Editor.” I show an image of doing this in the below image.
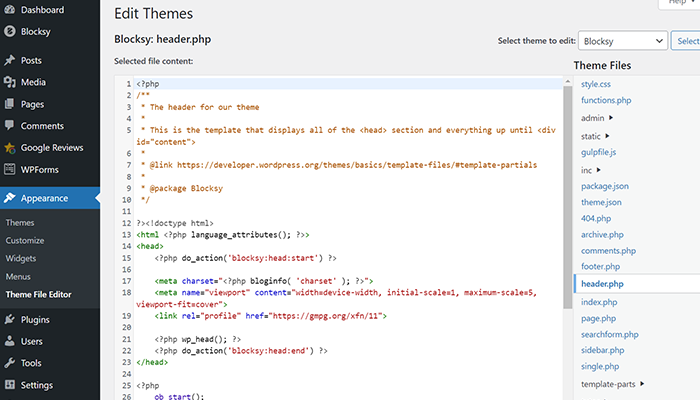
WordPress will give you a warning that doing something wrong could damage your site. Just ignore that; this is really simple.
Be sure you have copied the Schema code that Web 20 Ranker’s tool created for you. It won’t function if you miss part of the code. Then paste the code just above the closing header tag that looks like this </head>. In the above image, you can see my example on line 23.
To paste it in there, just click your curser before the closing header tag </head> and then hit your enter key. This will move your closing header tag down a line. So, in my example, it would move it down to line 24. Then, just paste your code on line 23. Save your changes, and you’re done.
To double-check that you did everything correctly, just go back to the Schema.org Validator Tool, where you tested your code. You will see a link in the top right-hand corner that says “NEW TEST.” Click on that, then click on the “FETCH URL” option, enter your website domain URL, and then run the test again.
This time, it will get your Schema Markup code directly off your website and check that it is structured properly. If this test comes back with no errors, you are done! Good job!
How To Paste Your Schema For A Multi-Location Business
For a multi-location local business, you will have created a separate Google Business Profile (GBP) location for each location of your business. Therefore, you will want to create a separate Schema markup code for each business location.
Hopefully, you created separate business directory location listings and social media listings for each of your locations. Be sure to use the correct social media pages and directory listings for each location as you create each Schema markup code.
Then, if you created your location pages correctly, you will have your NAP information along with an embedded Google Map of that location and Google Business Profile on each location page. Google Map Embeds use the html iframe title tags. The closing tag looks like this </iframe>.
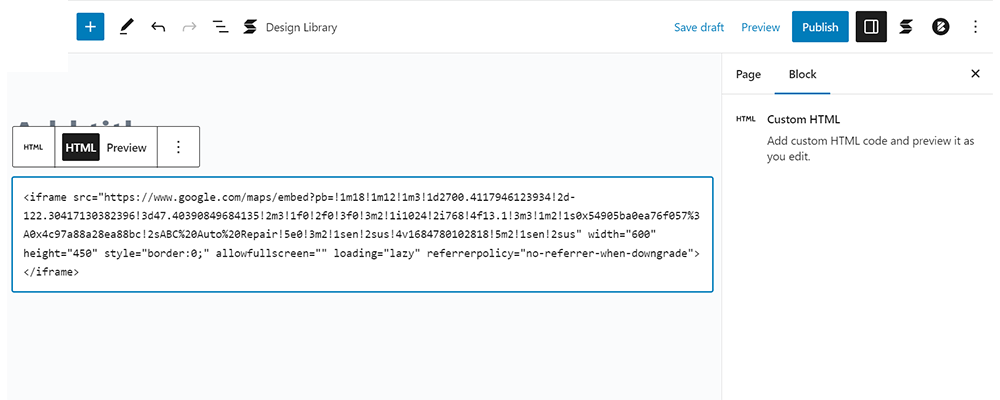
The above image shows a screenshot of my choosing a “Custome HTML” block in WordPress’s Gutenberg editor. You can see I pasted the HTML code for a GBP map. The code is closed with the closing tag </iframe>. You will want to paste your Schema markup html code just before the closing tag </iframe>. Then, update your page to save the changes.
To double-check that you did everything correctly, just go back to the Schema.org Validator Tool, where you tested your code. You will see a link in the top right-hand corner that says “NEW TEST.” Click on that, then click on the “FETCH URL” option, enter your website domain URL, and then run the test again.
This time, it will get your Schema Markup code directly off your website and check that it is properly structured. If this test comes back with no errors, you are done! Good job!
