Need to Outrank Your Competition? Call Us Today! ☏ (208) 782-7389
How To Optimize Images for local SEO!
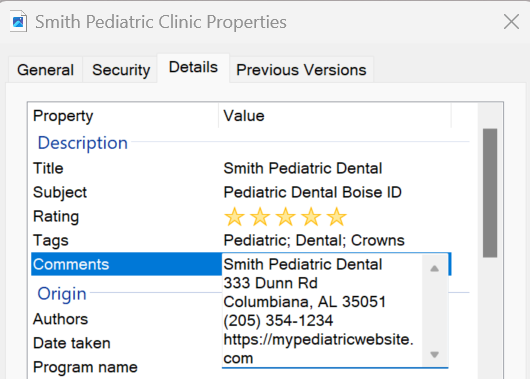
If you look at the above image, it is an example of how to optimize a Jpeg image file for both the keywords you want to rank for and your NAP information.
To optimize jpeg images for local SEO, first, you right-click on your image and select “Properties.” Then, you select the “Details” tab. In the title spot, you then write out the business name and, in 1 or 2 words, describe what the image is about. In the subject, you list the main industry keywords along with the city and state. In the tags spot, you list every keyword the business would like to rank for. Finally, in the comments, you list the business’s name, address, phone number (NAP Info), and website URL, followed by a keyword-rich thorough business description.
Remember, wherever you list a business’s NAP information, you list it exactly the same, identical to how you listed it every other place you have placed it on the internet. The more identical it is everywhere it is listed, the more trustworthy it is to the search engines.
Those are the basics of optimizing an image for local SEO. In this article, we will get into more specifics on why and when to optimize images and some very important details you will need to know to do this correctly!
Before we get into the rest of this article, I just want to suggest that if you are on this article because you are trying to learn local SEO, a great place to start is reading my article “How To Do Local SEO – An In-Depth Overview!” If you are more focused on learning On-Page Local SEO first, I recommend my article “What Is On-Page Local SEO?“
Why Should You Optimize Your Images?
When placed on an article on your website, an image file becomes part of the page’s HTML code. As the search engines scan the code of a page or post, not only are they reading the titles and text of the page to see what the article is about, but they are also looking for information about the business and reinforcing that it is credible and legitimate.
When it comes across things in the code that has your keywords, NAP information, website URL, a map to the business, and links to social media sites, etc., as long as this is presented in the format the search engines like to see it (no keyword stuffing) it helps the search engine get a full picture of the business and what it is really about.
In local SEO, we are trying to tie our business name and website to our location and industry and show the most credibility possible. So when you optimize your images, you want to Geo-Tag the images as well, which means listing the GPS coordinates of the business location in the code as well. To learn how to do this correctly, please see my article “How To Geotag Images For Local SEO“
When Should You Optimize Your Images?
In Local SEO, I always optimize my images for my keywords. You can be page/keyword specific if you really want to do it right, or you can just do all your industry keywords in every image.
So, I always fill out the title and subject spots in the image file exactly as I described at the beginning of this article. I always do the tags spot as I describe above, except that if the images will be going on a location page or my website is a one-location business, I would also include city and state as keywords in the tags section.
If my business is a one-location business, I do the comments section for every image exactly as I describe at the beginning of this article. If my business has multiple locations, I only include the address in the NAP info on the images on a location page. Be sure to use only the correct address for each location page. And the rest of the NAP info (name, phone & website URL) can be included in all images. Be sure to Geo-Tag images with the correct address only on images that you include the address.
Clearing Data Out Of Image File
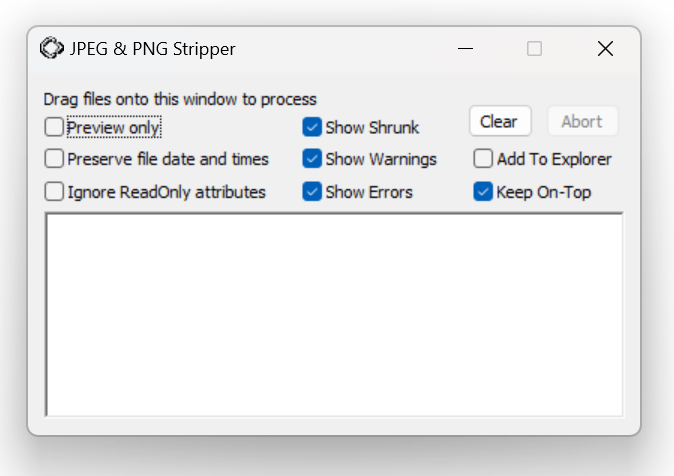
Image files, depending on where you got them (such as stock images), often contain a bit of data in the file that can tell the search engine where the file came from. Suppose you took your pictures yourself, especially with a camera that inputs the GPS coordinates in the image. In that case, you are better off not deleting any data from the file before optimizing it. Search engines love original photos.
However, if you got your image from a free site like Wikipedia or a stock photo, it is better to wipe all excess data off the file before optimizing it. That way, the search engines cannot tell where the image came from, and then you can just add the data you want in the file.
There is a nifty little software tool you can download and install on your computer, allowing you to clear off the excess data in two simple steps quickly. The tool is called “JPEG & PNG Stripper,” and the above image shows what it looks like.
All you do is download the file onto your computer and be sure to put the icon on your desktop for easy access. Then, when you double-click the icon, a little screen that looks like the above image opens up on your desktop. You then just drag the image and drop it into the white box at the bottom. You will see a bunch of data show up in the white box, and then you click on the “Clear” button, and you are done.
Then go ahead and Geo-Tag your image first if it is an image that you want Geo-Tagged, and then optimize it, and you are good to go!
Schema Markup Data
I like to do separate Schema Markup for each location page, each including the correct address, and I embed the code within one of the iframes I have embedded on that page.
In addition to that, I often also include the Schema Markup code after the business description in the comments section of each image on that page.
Including it within each image on the page, some people I know think that is a bit overkill. They will usually do the normal Schema iframe embedded as well as include it in the comments section of one of the images on that page. I think either way does the job.
Obviously, if your business only has one location, you can put the Schema Markup within the header file of the website rather than in an iframe so that it will show on every page. Then, you can include it in the comments section of any images you want on the site.